

CHOOSING A TEMPLATE:
• Click on “Templates” on the left hand side of your screen and select the template that you want to customize.
EDITING TEXT:
• Double click on the text box and replace the sample text with your own wording.
• Click on the blue anchor points around the text box to resize it.
• Click on the blue anchor point above the text box to rotate it.
• Click on text box and drag your cursor to move the text around.
• Use the design tools to change the font type, size, color, and style.
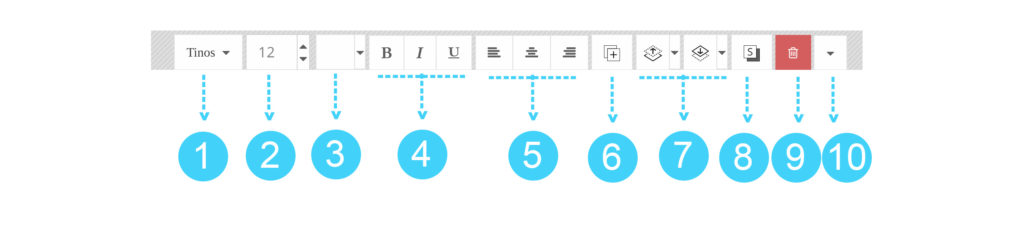
- Choose a font from the drop-down menu.
- Change the font size.
- Change the font color. If you know the hex value of the color that you want to use, click on “Show Advanced” to enter the number.
- Add Bold, Italic, or Underlined style.
- Choose a Left, Center, or Right text alignment.
- Duplicate the text box.
- Move the text element layer forward or backward.
- Add a drop- shadow effect.
- Delete the text box.
- Additional tools:
• Text Case : Change the text to all Uppercase, all Lowercase, or manual Capitalization.
• Line Height : Change the space between each row of text in a multi-line text box.
• Char Spacing : Change the space between characters.
• Lock Position : Lock the location of the text box.
• Opacity : Change the text transparency.
• Add Stroke : Add stroke around the text and customize the stroke color.
EDITING TEXT ELEMENTS THAT ARE PART OF THE ARTWORK:
There may be some text elements in your template that are considered part of the artwork. In this case, you will not be able to change the wording, however, you can still do the following customization:
• Change the color
• Move the element layer forward or backward
• Add drop shadow
• Delete the element
• Reposition, resize, and rotate the element
CHANGING THE BACKGROUND COLOR OR TEXTURE:
• Click on “Background” on the left hand side of your screen
• Choose a background color or texture from the available selections
• If you know the hex value of the color that you want to use, click on “Show Advanced” to enter the number
DOWNLOADING YOUR FILE:
Once you have finished editing your template, you can save the changes and download your final file in high quality of 300 dpi for best printing results. Available file format options:
OPTION 1: PDF
• Show Trim Mark : Turn this feature ON if you want to trim the template yourself.
• Save Paper: Turn this feature ON if you want to save paper by printing multiple templates on one page. You have the option to choose your page size in US Letter size or A4 size.
OPTION 2: JPEG
• Add Bleed : Turn this feature ON if you want to add bleed for professional printing.
• Multiple pages will be downloaded as separate JPEG’s in a zip file. You will need to unzip it to extract the individual files.
OPTION 3: PNG
• For web use.
• You can also clear the background to download the template with a transparent background. To remove the background color and texture, click on “Background” on the left hand-side of your screen, and click the red Trash Can icon below the search box.